deep space
deep sky astrophotography
This is a fairly specialised area of photographing the night sky and involves equipment that usually has to be ordered from companies that produce dedicated equipment such as can be seen here. This allows for detailed colour images of DSOs (Deep Sky Objects) to be taken of star clusters, nebulae and galaxies which would normally be completely invisible to the naked eye
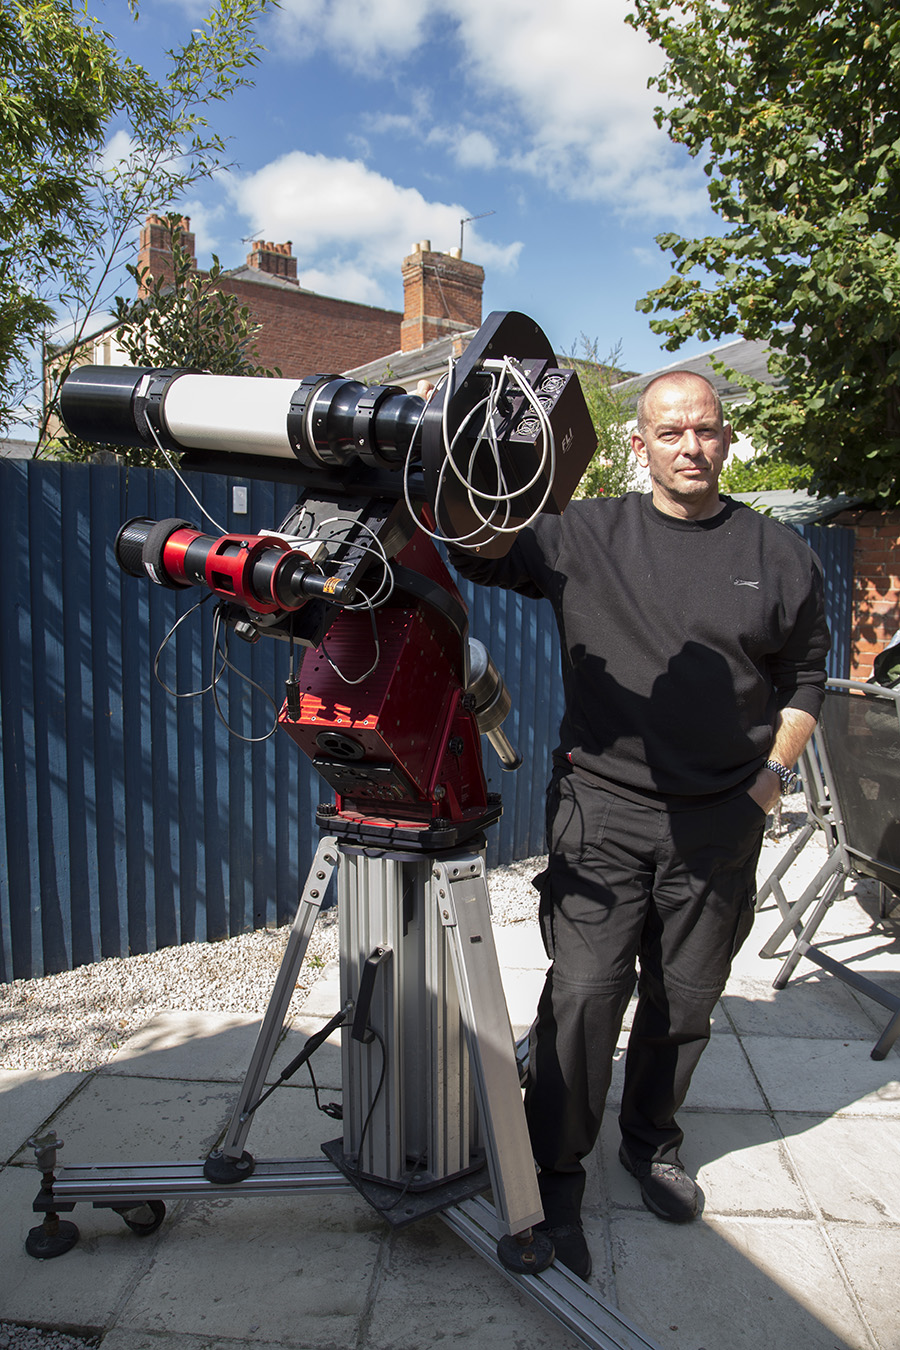
In the picture here is a very heavy duty tripod on lockable wheely bars to allow for a degree of transport, on this is a computerised equatorial mount which tracks the night sky, there are two telescopes (the white one for taking the pictures and the smaller red and black one for helping make tiny adjustments to the tracking to give pinpoint stars), on the back of the white telescope is the camera/filter wheel/focuser. Once everything is plugged in and switched on every aspect of collecting the data ie object selection, focusing, filter selection, exposure time, image capture, etc is controlled via a laptop with USB connections. All the raw data is then calibrated and processed on a desktop computer to create the final colour image
equipment & software
When choosing equipment for deep sky astrophotography you have think in the same lines as architecture so the most important part of any building is it’s foundations. In the case of astrophotography this is the tripod or pier that everything is put on top, it has to be very stable and flex free. The one you see in the picture above is a Tri-Pier 2 made by a company in America called Pier-tech, they also made the “wheely bars” so that the system could be moved when not in use. At the end of the wheely bars are screw down legs to keep everything level and stable. The next most important thing is the mount, this is what tracks the night sky and it also must be able to do this while carrying the imaging equipment, the one I used was the Paramount ME made by a company called Software Bisque in America and it was very reliable and could carry a load of 150lbs. I have used various telescopes during the years including a TMB115 f7 refractor, a Takahashi BRC250 f5 Baker Ritchey-Cretien, a Takahashi FSQ106 f5 refractor and in this picture a Televue NP127/FLI f6.3 astrograph (this was given to me by David Nagler of Televue for helping them beta test the system). Camera wise I have used cameras from Starlight Xpress, the H9 and H36 and from Finger Lakes Instrumentation (FLI), the Microline 8300, Proline 16803 and Microline x814. I have used electronic focusers and filter wheels from FLI including the PDF and with this system the Atlas focusers as well as the Centreline filterwheel. The smaller black and red telescope is a Falco guiding scope made by Officine Stellare with a Starlight Xpress guiding camera.
The different cameras had different size sensors with different pixel counts and also pixel sizes so they had different fields of view as well as different sensitivety. All the cameras I used were monochrome which meant that I had to take exposures through different filters to create a colour image
Everything is mains powered or USB powered so the camera, filter wheel, focuser, and mount all require mains supplies, luckily the Proline 16803 camera had a built in USB/power hub so the filter wheel and focuser plug directly into the camera (via the white cables on top) otherwise it is like trying to manage a load of spaghetti when the mount is slewing to a new target. Out of view of the picture was a garden shed where I had a laptop on a table and chair and everything was connected to the laptop via USB so there was the mount, both the imaging camera and the guiding camera, the focuser and the filter wheel all controlled via the laptop.
I used several software packages to control everything, SKY X to control the mount, Maxim DL to control the cameras and filter wheel and FLI focus to control the focuser. After all the raw data was acquired I used Maxim DL to calibrate all the raw data, Registar to register all the raw data so that it would all align accurately, Maxim DL to stack the data per filter and finally Photoshop to colour combine and process the images.
This all sounds complicated but after getting used to how everything worked I could be starting an imaging run within half an hour of taking the weather proff covers off the telescope and it would take me about 3 hours to have a finished colour image from the raw data.
LRGB filters (Luminance, Red, Green and Blue)
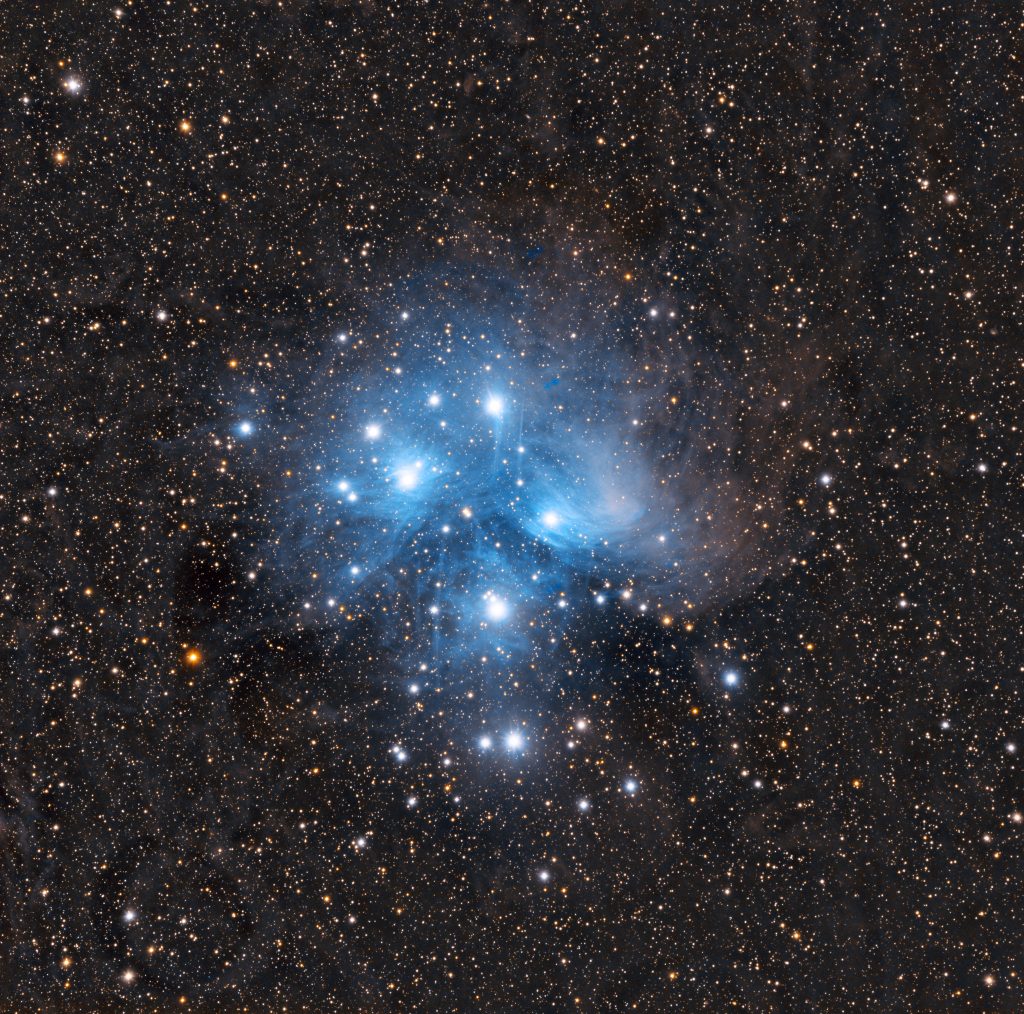
These filters produce images that would show colour how we would see it if ours eyes were sensitive enough, the luminance filter is effectively clear and provides all the detail while the red, gren and blue provide the colour. Multiple long exposures are taken through each filter which are then stacked per filter to give a clean master image per filter which is then colour combined and processed to give the final image
The major advantage is that these filters can be used for every subject but they are badly affected by light pollution and moon light so ideally require a dark site and imaging is best done during the new moon. An example of an LRGB image is below, this is M45 (Pleiades star cluster) in the constellation Taurus
Narrow Band filters (Ha, OIII and SII)
These filters isolate particular wavelengths of light radiated by gases in space, in the case of Ha it is Hydrogen Alpha (one of the wavelengths emitted by Hydrogen), OIII is doubly ionised Oxygen where two of the electrons have been stripped off by extreme radiation and SII is ionised Sulphur where one electron has been stripped off by extreme radiation. Multiple long exposures are taken for each filter which are then stacked per filter and colour combined to create a colour image. The colours in the final image represent the structure of each gas, this is very much what the HST (Hubble Space Telescope) does
The major advantage of these filters is that they are not affected by light pollution or moonlight as long as the subject isn’t too close to the moon. The filters are more expensive than LRGB and they are only suitable for imaging specific types of nebula ie emission, planetary and supernova remnants. An example of a narrowband image is below, this is IC1805 and IC1848 (Heart and Soul nebula) in the constellation Cassiopeia
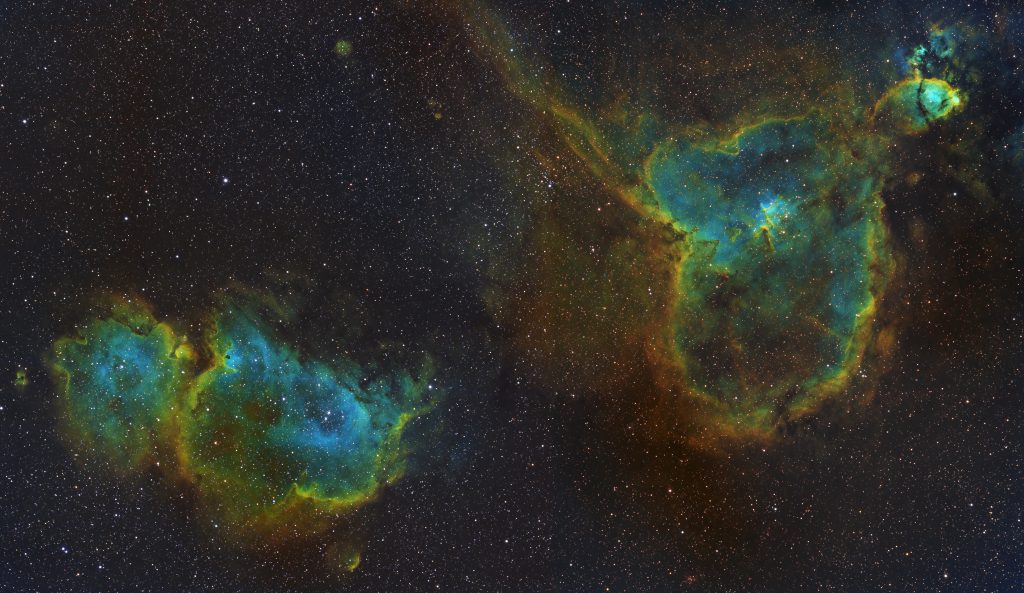
image acquisition
For all of the images taken with the telescope equipment it is important that there are clear skies with no clouds as clouds will not only ruin the image but they will upset the auto guider (secondary telescope/camera making fine adjustments to tracking).
As all of the exposures are between 5 and 10 minutes each and in order to get a nice clean end result you have to take approximately 20-30 exposures for each filter. Due to weather, other commitments and how long the particular target is visible this means that it can take several nights, weeks or even months to get enough data to complete one full image. Bear in mind that for a full colour narrow band image that could be 60-90 exposures of 10 minutes each.
The exposures that are downloaded from the camera to the laptop don’t look anything special, they look “noisy”, have gradients, vignetting, etc and have to be calibrated before you can do anything with them.
calibration
The cameras that I used for taking the deep sky images are quite sensitive, both to light and other unwanted artefacts such as vignetting, noise, defects in the optical system, etc. To counteract these defects the raw images have to be calibrated with dark frames (exposure with the shutter closed at the same temperature and exposure time as the raw frames), flat field frames (short exposure of the defects of the optical system such as vignetting, dust motes, etc) – has to be done per filter. To make things even more complicated flat field frames should also be dark subtracted so separate dark frames have to be taken for the flat field frames as they need to have to same exposure time. Sometimes bias frames are also used (zero length exposure with shutter closed).
Calibration frames can be re-used so I had a library of them which I used to calibrate my images.
Once calibrated the raw frames looked cleaner and had a more uniform appearance. Calibration is an essential part of imaging.
stacking
To get the best results out of your hard work one of the most important aspects of astrophotography is to get a good signal/noise ratio. One of the best ways of doing this is to stack images per filter using software. For example, if you took 30 x 10 minute exposures for each filter then you stack the 30 exposures for each filter which will then give you a master frame for each filter, this will have noticeably less noise and look much cleaner than a single raw exposure.
There are various algorithms in the software packages used for stacking that can remove things such as aeroplane or satellite trails as those can detract from what would have been an excellent image.
The more images that you stack per filter the smoother the final result will be and also it will be easier to process as some of the images require a high degree of stretching in order for all the faint detail to be brought out. Some faint narrow band targets require more stretching.
processing
There are numerous software packages available on the market such as Photoshop and Pixinsght. Pixinsight is specific to astroimaging so it is very much a dedicated tool.
The processing that is done will vary as to whether you are doing LRGB or narrow band, narrow band tends to be a bit harder as the histograms of the three filters generally have to be equalised in order to give a good result.
Apart from this the processing workflow is generally very simple, you are going to look at bringing out as much detail as possible using levels and curves, making some colour balance adjustments, contrast and saturation alterations as well.
Sometimes during the processing a gradient may appear due to having to contend with light pollution, this can be easily dealt with either directly in the software or with plugins that are widely available such as “Gradient Xterminator” by Russ Croman which is available on line.